Category Archives: Software

How are you handling building local Debian/Ubuntu packages?

I’m in the middle of some conversations about Debian/Ubuntu repositories, and I’m curious how others are handling this.

How are people maintaining repos for an organization? Are you integrating them with a git/CI (github/gitlab, jenkins/travis, etc) workflow? How do packages propagate into repos? How do you separate prod from testing? Is anyone running buildd locally, or integrating with more common CI tools?

I’m also interested in how people handle local modifications of packages — anything from newer versions of C libraries to newer interpreters. Do you just use the regular Debian toolchain, packaging them up for (potentially) the multiple distros/versions that you have in production? Pin them in apt?

Just curious what’s out there.

Some Googling has so far turned up just one relevant hit: Michael Prokop’s DebConf15 slides, “Continuous Delivery of Debian packages”. Looks very interesting, and discusses jenkins-debian-glue.

Some tangentially-related but interesting items:

Edit 2018-02-02: I should have also mentioned BuildStream

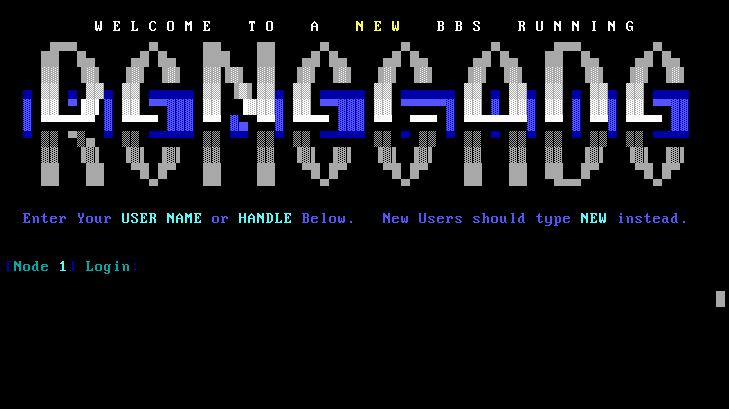
An old DOS BBS in a Docker container

Awhile back, I wrote about my Debian Docker base images. I decided to extend this concept a bit further: to running DOS applications in Docker.

But first, a screenshot:

It turns out this is possible, but difficult. I went through all three major DOS emulators available (dosbox, qemu, and dosemu). I got them all running inside the Docker container, but had a number of, er, fun issues to resolve.

The general thing one has to do here is present a fake modem to the DOS environment. This needs to be exposed outside the container as a TCP port. That much is possible in various ways — I wound up using tcpser. dosbox had a TCP modem interface, but it turned out to be too buggy for this purpose.

The challenge comes in where you want to be able to accept more than one incoming telnet (or TCP) connection at a time. DOS was not a multitasking operating system, so there were any number of hackish solutions back then. One might have had multiple physical computers, one for each incoming phone line. Or they might have run multiple pseudo-DOS instances under a multitasking layer like DESQview, OS/2, or even Windows 3.1.

(Side note: I just learned of DESQview/X, which integrated DESQview with X11R5 and replaced the Windows 3 drivers to allow running Windows as an X application).

For various reasons, I didn’t want to try running one of those systems inside Docker. That left me with emulating the original multiple physical node setup. In theory, pretty easy — spin up a bunch of DOS boxes, each using at most 1MB of emulated RAM, and go to town. But here came the challenge.

In a multiple-physical-node setup, you need some sort of file sharing, because your nodes have to access the shared message and file store. There were a myriad of clunky ways to do this in the old DOS days – Netware, LAN manager, even some PC NFS clients. I didn’t have access to Netware. I tried the Microsoft LM client in DOS, talking to a Samba server running inside the Docker container. This I got working, but the LM client used so much RAM that, even with various high memory tricks, BBS software wasn’t going to run. I couldn’t just mount an underlying filesystem in multiple dosbox instances either, because dosbox did caching that wasn’t going to be compatible.

This is why I wound up using dosemu. Besides being a more complete emulator than dosbox, it had a way of sharing the host’s filesystems that was going to work.

So, all of this wound up with this: jgoerzen/docker-bbs-renegade.

I also prepared building blocks for others that want to do something similar: docker-dos-bbs and the lower-level docker-dosemu.

As a side bonus, I also attempted running this under Joyent’s Triton (SmartOS, Solaris-based). I was pleasantly impressed that I got it all almost working there. So yes, a Renegade DOS BBS running under a Linux-based DOS emulator in a container on a Solaris machine.

The Yellow House Phone Company (Featuring Asterisk and an 11-year-old)

“Well Jacob, do you think we should set up our own pretend phone company in the house?”

“We can DO THAT?”

“Yes!”

“Then… yes. Yes! YES YES YESYESYESYES YES! Let’s do it, dad!”

Not long ago, my parents had dug up the old phone I used back in the day. We still have a landline, and Jacob was having fun discovering how an analog phone works. I told him about the special number he could call to get the time and temperature read out to him. He discovered what happens if you call your own number and hang up. He figured out how to play “Mary Had a Little Lamb” using touchtone keys (after a slightly concerned lecture from me setting out some rules to make sure his “musical dialing” wouldn’t result in any, well, dialing.)

He was hooked. So I thought that taking it to the next level would be a good thing for a rainy day. I have run Asterisk before, though I had unfortunately gotten rid of most of my equipment some time back. But I found a great deal on a Cisco 186 ATA (Analog Telephone Adapter). It has two FXS lines (FXS ports simulate the phone company, and provide dialtone and ring voltage to a connected phone), and of course hooks up to the LAN.

We plugged that in, and Jacob was amazed to see its web interface come up. I had to figure out how to configure it (unfortunately, it uses SCCP rather than SIP, and figuring out Asterisk’s chan_skinny took some doing, but we got there.)

I set up voicemail. He loved it. He promptly figured out how to record his own greetings. We set up a second phone on the other line, so he could call between them. The cordless phones in our house support SIP, so I configured one of them as a third line. He spent a long time leaving himself messages.

IMG_3465

Pretty soon we both started having ideas. I set up extension 777, where he could call for the time. Then he wanted a way to get the weather forecast. Well, weather-util generates a text-based report. With it, a little sed and grep tweaking, the espeak TTS engine, and a little help from sox, I had a shell script worked up that would read back a forecast whenever he called a certain extension. He was super excited! “That’s great, dad! Can it also read weather alerts too?” Sure! weather-util has a nice option just for that. Both boys cackled as the system tried to read out the NWS header (their timestamps like 201711031258 started with “two hundred one billion…”)

Then I found an online source for streaming NOAA Weather Radio feeds – Jacob enjoys listening to weather radio – and I set up another extension he could call to listen to that. More delight!

But it really took off when I asked him, “Would you like to record your own menu?” “You mean those things where it says press 1 or 2 for this or that?” “Yes.” “WE CAN DO THAT?” “Oh yes!” “YES, LET’S DO IT RIGHT NOW!”

So he recorded a menu, then came and hovered by me while I hacked up extensions.conf, then eagerly went back to the phone to try it. Oh the excitement of hearing hisown voice, and finding that it worked! Pretty soon he was designing sub-menus (“OK Dad, so we’ll set it up so people can press 2 for the weather, and then choose if they want weather radio or the weather report. I’m recording that now. Got it?”)

He has informed me that next Saturday we will build an intercom system “like we have at school.” I’m going to have to have some ideas on how to tie Squeezebox in with Asterisk to make that happen, I think. Maybe this will do.

Switching to xmonad + Gnome – and ditching a Mac

I have been using XFCE with xmonad for years now. I’m not sure exactly how many, but at least 6 years, if not closer to 10. Today I threw in the towel and switched to Gnome.

More recently, at a new job, I was given a Macbook Pro. I wasn’t entirely sure what to think of this, but I thought I’d give it a try. I found MacOS to be extremely frustrating and confining. It had no real support for a tiling window manager, and although projects like amethyst tried to approximate what xmonad can do on Linux, they were just too limited by the platform and were clunky. Moreover, the entire UI was surprisingly sluggish; maybe that was an induced effect from animations, but I don’t think that explains it. A Debisn stretch install, even on inferior hardware, was snappy in a way that MacOS never was. So I have requested to swap for a laptop that will run Debian. The strange use of Command instead of Control for things, combined with the overall lack of configurability of keybindings, meant that I was going to always be fighting muscle memory moving from one platform to another. Not only that, but being back in the world of a Free Software OS means a lot.

Now then, back to xmonad and XFCE situation. XFCE once worked very well with xmonad. Over the years, this got more challenging. Around the jessie (XFCE 4.10) time, I had to be very careful about when I would let it save my session, because it would easily break. With stretch, I had to write custom scripts because the panel wouldn’t show up properly, and even some application icons would be invisible, if things were started in a certain order. This took much trial and error and was still cumbersome.

Gnome 3, with its tightly-coupled Gnome Shell, has never been compatible with other window managers — at least not directly. A person could have always used MATE with xmonad — but a lot of people that run XFCE tend to have some Gnome 3 apps (for instance, evince) anyhow. Cinnamon also wouldn’t work with xmonad, because it is simply another tightly-coupled shell instead of Gnome Shell. And then today I discovered gnome-flashback. gnome-flashback is a Gnome 3 environment that uses the traditional X approach with a separate window manager (metacity of yore by default). Sweet.

It turns out that Debian’s xmonad has built-in support for it. If you know the secret: apt-get install gnome-session-flashback (OK, it’s not so secret; it’s even in xmonad’s README.Debian these days) Install that, plus gnome and gdm3 and things are nice. Configure xmonad with GNOME support and poof – goodness right out of the box, selectable from the gdm sessions list.

I still have some gripes about Gnome’s configurability (or lack thereof). But I’ve got to say: This environment is the first one I’ve ever used that got external display switching very nearly right without any configuration, and I include MacOS in that. Plug in an external display, and poof – it’s configured and set up. You can hit a toggle key (Windows+P by default) to change the configurations, or use the Display section in gnome-control-center. Unplug it, and it instantly reconfigures itself to put everything back on the laptop screen. Yessss! I used to have scripts to do this in the wheezy/jessie days. XFCE in stretch had numerous annoying failures in this area which rendered the internal display completely dark until the next reboot – very frustrating. With Gnome, it just works. And, even if you have “suspend on lid closed” turned on, if the system is powered up and hooked up to an external display, it will keep running even if the lid is closed, figuring you must be using it on the external screen. Another thing the Mac wouldn’t do well.

All in all, some pretty good stuff here. I continue to be impressed by stretch. It is darn impressive to put this OS on generic hardware and have it outshine the closed-ecosystem Mac!

Fixing the Problems with Docker Images

I recently wrote about the challenges in securing Docker container contents, and in particular with keeping up-to-date with security patches from all over the Internet.

Today I want to fix that.

Besides security, there is a second problem: the common way of running things in Docker pretends to provide a traditional POSIX API and environment, but really doesn’t. This is a big deal.

Before diving into that, I want to explain something: I have often heard it said the Docker provides single-process containers. This is unambiguously false in almost every case. Any time you have a shell script inside Docker that calls cp or even ls, you are running a second process. Web servers from Apache to whatever else use processes or threads of various types to service multiple connections at once. Many Docker containers are single-application, but a process is a core part of the POSIX API, and very little software would work if it was limited to a single process. So this is my little plea for more precise language. OK, soapbox mode off.

Now then, in a traditional Linux environment, besides your application, there are other key components of the system. These are usually missing in Docker containers.

So today, I will fix this also.

In my docker-debian-base images, I have prepared a system that still has only 11MB RAM overhead, makes minimal changes on top of Debian, and yet provides a very complete environment and API. Here’s what you get:

  • A real init system, capable of running standard startup scripts without modification, and solving the nasty Docker zombie reaping problem.
  • Working syslog, which can either export all logs to Docker’s logging infrastructure, or keep them within the container, depending on your preferences.
  • Working real schedulers (cron, anacron, and at), plus at least the standard logrotate utility to help prevent log files inside the container from becoming huge.

The above goes into my “minimal” image. Additional images add layers on top of it, and here are some of the features they add:

  • A real SMTP agent (exim4-daemon-light) so that cron and friends can actually send you mail
  • SSH client and server (optionally exposed to the Internet)
  • Automatic security patching via unattended-upgrades and needsrestart

All of the above, including the optional features, has an 11MB overhead on start. Not bad for so much, right?

From here, you can layer on top all your usual Dockery things. You can still run one application per container. But you can now make sure your disk doesn’t fill up from logs, run your database vacuuming commands at will, have your blog download its RSS feeds every few minutes, etc — all from within the container, as it should be. Furthermore, you don’t have to reinvent the wheel, because Debian already ships with things to take care of a lot of this out of the box — and now those tools will just work.

There is some popular work done in this area already by phusion’s baseimage-docker. However, I made my own for these reasons:

  • I wanted something based on Debian rather than Ubuntu
  • By using sysvinit rather than runit, the OS default init scripts can be used unmodified, reducing the administrative burden on container builders
  • Phusion’s system is, for some reason, not auto-built on the Docker hub. Mine is, so it will be automatically revised whenever the underlying Debian system, or the Github repository, is.

Finally a word on the choice to use sysvinit. It would have been simpler to use systemd here, since it is the default in Debian these days. Unfortunately, systemd requires you to poke some holes in the Docker security model, as well as mount a cgroups filesystem from the host. I didn’t consider this acceptable, and sysvinit ran without these workarounds, so I went with it.

With all this, Docker becomes a viable replacement for KVM for various services on my internal networks. I’ll be writing about that later.

Silent Data Corruption Is Real

Here’s something you never want to see:

ZFS has detected a checksum error:

   eid: 138
 class: checksum
  host: alexandria
  time: 2017-01-29 18:08:10-0600
 vtype: disk

This means there was a data error on the drive. But it’s worse than a typical data error — this is an error that was not detected by the hardware. Unlike most filesystems, ZFS and btrfs write a checksum with every block of data (both data and metadata) written to the drive, and the checksum is verified at read time. Most filesystems don’t do this, because theoretically the hardware should detect all errors. But in practice, it doesn’t always, which can lead to silent data corruption. That’s why I use ZFS wherever I possibly can.

As I looked into this issue, I saw that ZFS repaired about 400KB of data. I thought, “well, that was unlucky” and just ignored it.

Then a week later, it happened again. Pretty soon, I noticed it happened every Sunday, and always to the same drive in my pool. It so happens that the highest I/O load on the machine happens on Sundays, because I have a cron job that runs zpool scrub on Sundays. This operation forces ZFS to read and verify the checksums on every block of data on the drive, and is a nice way to guard against unreadable sectors in rarely-used data.

I finally swapped out the drive, but to my frustration, the new drive now exhibited the same issue. The SATA protocol does include a CRC32 checksum, so it seemed (to me, at least) that the problem was unlikely to be a cable or chassis issue. I suspected motherboard.

It so happened I had a 9211-8i SAS card. I had purchased it off eBay awhile back when I built the server, but could never get it to see the drives. I wound up not filling it up with as many drives as planned, so the on-board SATA did the trick. Until now.

As I poked at the 9211-8i, noticing that even its configuration utility didn’t see any devices, I finally started wondering if the SAS/SATA breakout cables were a problem. And sure enough – I realized I had a “reverse” cable and needed a “forward” one. $14 later, I had the correct cable and things are working properly now.

One other note: RAM errors can sometimes cause issues like this, but this system uses ECC DRAM and the errors would be unlikely to always manifest themselves on a particular drive.

So over the course of this, had I not been using ZFS, I would have had several megabytes of reads with undetected errors. Thanks to using ZFS, I know my data integrity is still good.

Easily Improving Linux Security with Two-Factor Authentication

2-Factor Authentication (2FA) is a simple way to help improve the security of your systems. It restricts the scope of damage if a machine is compromised. If, for instance, you have a security token or authenticator app on your phone that is required for ssh to a remote machine, then even if every laptop you use to connect to the remote is totally owned, an attacker cannot establish a new ssh session on their own.

There are a lot of tutorials out there on the Internet that get you about halfway there, so here is some more detail.

Background

In this article, I will be focusing on authentication in the style of Google Authenticator, which is a special case of OATH HOTP or TOTP. You can use the Google Authenticator app, FreeOTP, or a hardware token like Yubikey to generate tokens with this. They are all 100% compatible with Google Authenticator and libpam-google-authenticator.

The basic idea is that there is a pre-shared secret key. At each login, a different and unique token is required, which is generated based on the pre-shared secret key and some other information. With TOTP, the “other information” is the current time, implying that both machines must be reasably well in-sync time-wise. With HOTP, the “other information” is a count of the number of times the pre-shared key has been used. Both typically have a “window” on the server side that can let times within a certain number of seconds, or a certain number of login accesses, work.

The beauty of this system is that after the initial setup, no Internet access is required on either end to validate the key (though TOTP requires both ends to be reasonably in sync time-wise).

The basics: user account setup and ssh authentication

You can start with the basics by reading one of these articles: one, two, three. Debian/Ubuntu users will find both the pam module and the user account setup binary in libpam-google-authenticator.

For many, you can stop there. You’re done. But if you want to kick it up a notch, read on:

Enhancement 1: Requiring 2FA even when ssh public key auth is used

Let’s consider a scenario in which your system is completely compromised. Unless your ssh keys are also stored in something like a Yubikey Neo, they could wind up being compromised as well – if someone can read your files and sniff your keyboard, your ssh private keys are at risk.

So we can configure ssh and PAM so that a OTP token is required even for this scenario.

First off, in /etc/ssh/sshd_config, we want to change or add these lines:

UsePAM yes
ChallengeResponseAuthentication yes
AuthenticationMethods publickey,keyboard-interactive

This forces all authentication to pass two verification methods in ssh: publickey and keyboard-interactive. All users will have to supply a public key and then also pass keyboard-interactive auth. Normally keyboard-interactive auth prompts for a password, but we can change /etc/pam.d/sshd on this. I added this line at the very top of /etc/pam.d/sshd:

auth [success=done new_authtok_reqd=done ignore=ignore default=bad] pam_google_authenticator.so

This basically makes Google Authenticator both necessary and sufficient for keyboard-interactive in ssh. That is, whenever the system wants to use keyboard-interactive, rather than prompt for a password, it instead prompts for a token. Note that any user that has not set up google-authenticator already will be completely unable to ssh into their account.

Enhancement 1, variant 2: Allowing automated processes to root

On many of my systems, I have ~root/.ssh/authorized_keys set up to permit certain systems to run locked-down commands for things like backups. These are automated commands, and the above configuration will break them because I’m not going to be typing in codes at 3AM.

If you are very restrictive about what you put in root’s authorized_keys, you can exempt the root user from the 2FA requirement in ssh by adding this to sshd_config:

Match User root
  AuthenticationMethods publickey

This says that the only way to access the root account via ssh is to use the authorized_keys file, and no 2FA will be required in this scenario.

Enhancement 1, variant 2: Allowing non-pubkey auth

On some multiuser systems, some users may still want to use password auth rather than publickey auth. There are a few ways we can support that:

  1. Users without public keys will have to supply a OTP and a password, while users with public keys will have to supply public key, OTP, and a password
  2. Users without public keys will have to supply OTP or a password, while users with public keys will have to supply public key, OTP, or a password
  3. Users without public keys will have to supply OTP and a password, while users with public keys only need to supply the public key

The third option is covered in any number of third-party tutorials. To enable options 1 or 2, you’ll need to put this in sshd_config:

AuthenticationMethods publickey,keyboard-interactive keyboard-interactive

This means that to authenticate, you need to pass either publickey and then keyboard-interactive auth, or just keyboard-interactive auth.

Then in /etc/pam.d/sshd, you put this:

auth required pam_google_authenticator.so

As a sub-variant for option 1, you can add nullok to here to permit auth from people that do not have a Google Authenticator configuration.

Or for option 2, change “required” to “sufficient”. You should not add nullok in combination with sufficient, because that could let people without a Google Authenticator config authenticate completely without a password at all.

Enhancement 2: Configuring su

A lot of other tutorials stop with ssh (and maybe gdm) but forget about the other ways we authenticate or change users on a system. su and sudo are the two most important ones. If your root password is compromised, you don’t want anybody to be able to su to that account without having to supply a token. So you can set up google-authenticator for root.

Then, edit /etc/pam.d/su and insert this line after the pam_rootok.so line:

auth       required     pam_google_authenticator.so nullok

The reason you put this after pam_rootok.so is because you want to be able to su from root to any account without having to input a token. We add nullok to the end of this, because you may want to su to accounts that don’t have tokens. Just make sure to configure tokens for the root account first.

Enhancement 3: Configuring sudo

This one is similar to su, but a little different. This lets you, say, secure the root password for sudo.

Normally, you might sudo from your user account to root (if so configured). You might have sudo configured to require you to enter in your own password (rather than root’s), or to just permit you to do whatever you want as root without a password.

Our first step, as always, is to configure PAM. What we do here depends on your desired behavior: do you want to require someone to supply both a password and a token, or just a token, or require a token? If you want to require a token, put this at the top of /etc/pam.d/sudo:

auth [success=done new_authtok_reqd=done ignore=ignore default=bad] pam_google_authenticator.so

If you want to require a token and a password, change the bracketed string to “required”, and if you want a token or a password, change it to “sufficient”. As before, if you want to permit people without a configured token to proceed, add “nullok”, but do not use that with “sufficient” or the bracketed example here.

Now here comes the fun part. By default, if a user is required to supply a password to sudo, they are required to supply their own password. That does not help us here, because a user logged in to the system can read the ~/.google_authenticator file and easily then supply tokens for themselves. What you want to do is require them to supply root’s password. Here’s how I set that up in sudoers:

Defaults:jgoerzen rootpw
jgoerzen ALL=(ALL) ALL

So now, with the combination of this and the PAM configuration above, I can sudo to the root user without knowing its password — but only if I can supply root’s token. Pretty slick, eh?

Further reading

In addition to the basic tutorials referenced above, consider:

Edit: additional comments

Here are a few other things to try:

First, the libpam-google-authenticator module supports putting the Google Authenticator files in different locations and having them owned by a certain user. You could use this to, for instance, lock down all secret keys to be readable only by the root user. This would prevent users from adding, changing, or removing their own auth tokens, but would also let you do things such as reusing your personal token for the root account without a problem.

Also, the pam-oath module does much of the same things as the libpam-google-authenticator module, but without some of the help for setup. It uses a single monolithic root-owned password file for all accounts.

There is an oathtool that can be used to generate authentication codes from the command line.

I’m switching from git-annex to Syncthing

I wrote recently about using git-annex for encrypted sync, but due to a number of issues with it, I’ve opted to switch to Syncthing.

I’d been using git-annex with real but noncritical data. Among the first issues I noticed was occasional but persistent high CPU usage spikes, which once started, would persist apparently forever. I had an issue where git-annex tried to replace files I’d removed from its repo with broken symlinks, but the real final straw was a number of issues with the gcrypt remote repos. git-remote-gcrypt appears to have a number of issues with possible race conditions on the remote, and at least one of them somehow caused encrypted data to appear in a packfile on a remote repo. Why there was data in a packfile there, I don’t know, since git-annex is supposed to keep the data out of packfiles.

Anyhow, git-annex is still an awesome tool with a lot of use cases, but I’m concluding that live sync to an encrypted git remote isn’t quite there yet enough for me.

So I looked for alternatives. My main criteria were supporting live sync (via inotify or similar) and not requiring the files to be stored unencrypted on a remote system (my local systems all use LUKS). I found Syncthing met these requirements.

Syncthing is pretty interesting in that, like git-annex, it doesn’t require a centralized server at all. Rather, it forms basically a mesh between your devices. Its concept is somewhat similar to the proprietary Bittorrent Sync — basically, all the nodes communicate about what files and chunks of files they have, and the changes that are made, and immediately propagate as much as possible. Unlike, say, Dropbox or Owncloud, Syncthing can actually support simultaneous downloads from multiple remotes for optimum performance when there are many changes.

Combined with syncthing-inotify or syncthing-gtk, it has immediate detection of changes and therefore very quick propagation of them.

Syncthing is particularly adept at figuring out ways for the nodes to communicate with each other. It begins by broadcasting on the local network, so known nearby nodes can be found directly. The Syncthing folks also run a discovery server (though you can use your own if you prefer) that lets nodes find each other on the Internet. Syncthing will attempt to use UPnP to configure firewalls to let it out, but if that fails, the last resort is a traffic relay server — again, a number of volunteers host these online, but you can run your own if you prefer.

Each node in Syncthing has an RSA keypair, and what amounts to part of the public key is used as a globally unique node ID. The initial link between nodes is accomplished by pasting the globally unique ID from one node into the “add node” screen on the other; the user of the first node then must accept the request, and from that point on, syncing can proceed. The data is all transmitted encrypted, of course, so interception will not cause data to be revealed.

Really my only complaint about Syncthing so far is that, although it binds to localhost, the web GUI does not require authentication by default.

There is an ITP open for Syncthing in Debian, but until then, their apt repo works fine. For syncthing-gtk, the trusty version of the webupd8 PPD works in Jessie (though be sure to pin it to a low priority if you don’t want it replacing some unrelated Debian packages).

Count me as a systemd convert

Back in 2014, I wrote about some negative first impressions of systemd. I also had a plea to debian-project to end all the flaming, pointing out that “jessie will still boot”, noting that my preference was for sysvinit but things are what they are and it wasn’t that big of a deal.

Although I still have serious misgivings about the systemd upstream’s attitude, I’ve got to say I find the system rather refreshing and useful in practice.

Here’s an example. I was debugging the boot on a server recently. It mounts a bunch of NFS filesystems and runs a third-party daemon that is started from an old-style /etc/init.d script.

We had a situation where the NFS filesystems the daemon required didn’t mount on boot. The daemon then was started, and unfortunately it basically does a mkdir -p on startup. So it started running and processing requests with negative results.

So there were two questions: why did the NFS filesystems fail to start, and how could we make sure the daemon wouldn’t start without them mounted? For the first, journalctl -xb was immensely helpful. It logged the status of each individual mount, and it turned out that it looked like a modprobe or kernel race condition when a bunch of NFS mounts were kicked off in parallel and all tried to load the nfsv4 module at the same time. That was easy enough to work around by adding nfsv4 to /etc/modules. Now for the other question: refusing to start the daemon if the filesystems weren’t there.

With systemd, this was actually trivial. I created /etc/systemd/system/mydaemon.service.requires (I’ll call the service “mydaemon” here), and in it I created a symlink to /lib/systemd/system/remote-fs.target. Then systemctl daemon-reload, and boom, done. systemctl list-dependencies mydaemon will even show the the dependency tree, color-coded status of each item on it, and will actually show every single filesystem that remote-fs requires and the status of it in one command. Super handy.

In a non-systemd environment, I’d probably be modifying the init script and doing a bunch of manual scripting to check the filesystems. Here, one symlink and one command did it, and I get tools to inspect the status of the mydaemon prerequisites for free.

I’ve got to say, as someone that has occasionally had to troubleshoot boot ordering and update-rc.d symlink hell, troubleshooting this stuff in systemd is considerably easier and the toolset is more powerful. Yes, it has its set of poorly-documented complexity, but then so did sysvinit.

I never thought the “world is falling” folks were right, but by now I can be counted among those that feels like systemd has matured to the point where it truly is superior to sysvinit. Yes, in 2014 it had some bugs, but by here in 2016 it looks pretty darn good and I feel like Debian’s decision has been validated through my actual experience with it.

Hiking a mountain with Ian Murdock

“Would you like to hike a mountain?” That question caught me by surprise. It was early in 2000, and I had flown to Tucson for a job interview. Ian Murdock was starting a new company, Progeny, and I was being interviewed for their first hire.

“Well,” I thought, “hiking will be fun.” So we rode a bus or something to the top of the mountain and then hiked down. Our hike was full of — well, everything. Ian talked about Tucson and the mountains, about his time as the Debian project leader, about his college days. I asked about the plants and such we were walking past. We talked about the plans for Progeny, my background, how I might fit in. It was part interview, part hike, part two geeks chatting. Ian had no HR telling him “you can’t go hiking down a mountain with a job candidate,” as I’m sure HR would have. And I am glad of it, because even 16 years later, that is still by far the best time I ever had at a job interview, despite the fact that it ruined the only pair of shoes I had brought along — I had foolishly brought dress shoes for a, well, job interview.

I guess it worked, too, because I was hired. Ian wanted to start up the company in Indianapolis, so over the next little while there was the busy work of moving myself and setting up an office. I remember those early days – Ian and I went computer shopping at a local shop more than once to get the first workstations and servers for the company. Somehow he had found a deal on some office space in a high-rent office building. I still remember the puzzlement on the faces of accountants and lawyers dressed up in suits riding in the elevators with us in our shorts and sandals, or tie-die, next to them.

Progeny’s story was to be a complicated one. We set out to rock the world. We didn’t. We didn’t set out to make lasting friendships, but we often did. We set out to accomplish great things, and we did some of that, too.

We experienced a full range of emotions there — elation when we got hardware auto-detection working well or when our downloads looked very popular, despair when our funding didn’t come through as we had hoped, being lost when our strategy had to change multiple times. And, as is the case everywhere, none of us were perfect.

I still remember the excitement after we published our first release on the Internet. Our little server that could got pegged at 100Mb of outbound bandwidth (that was something for a small company in those days.) The moment must have meant something, because I still have the mrtg chart from that day on my computer, 15 years later.

Progeny's Bandwidth Chart

We made a good Linux distribution, an excellent Debian derivative, but commercial success did not flow from it. In the succeeding months, Ian and the company tried hard to find a strategy that would stick and make our big break. But that never happened. We had several rounds of layoffs when hoped-for funding never materialized. Ian eventually lost control of the company, and despite a few years of Itanium contract work after I left, closed for good.

Looking back, Progeny was life — compressed. During the good times, we had joy, sense of accomplishment, a sense of purpose at doing something well that was worth doing. I had what was my dream job back then: working on Debian as I loved to do, making the world a better place through Free Software, and getting paid to do it. And during the bad times, different people at Progeny experienced anger, cynicism, apathy, sorrow for the loss of our friends or plans, or simply a feeling to soldier on. All of the emotions, good or bad, were warranted in their own way.

Bruce Byfield, one of my co-workers at Progeny, recently wrote a wonderful memoriam of Ian. He wrote, “More than anything, he wanted to repeat his accomplishment with Debian, and, naturally he wondered if he could live up to his own expectations of himself. That, I think, was Ian’s personal tragedy — that he had succeeded early in life, and nothing else he did with his life could quite measure up to his expectations and memories.”

Ian was not the only one to have some guilt over Progeny. I, for years, wondered if I should have done more for the company, could have saved things by doing something more, or different. But I always came back to the conclusion I had at the time: that there was nothing I could do — a terribly sad realization.

In the years since, I watched Ubuntu take the mantle of easy-to-install Debian derivative. I saw them reprise some of the ideas we had, and even some of our mistakes. But by that time, Progeny was so thoroughly forgotten that I doubt they even realized they were doing it.

I had long looked at our work at Progeny as a failure. Our main goal was never accomplished, our big product never sold many copies, our company eventually shuttered, our rock-the-world plan crumpled and forgotten. And by those traditional measurements, you could say it was a failure.

But I have come to learn in the years since that success is a lot more that those things. Success is also about finding meaning and purpose through our work. As a programmer, success is nailing that algorithm that lets the application scale 10x more than before, or solving that difficult problem. As a manager, success is helping team members thrive, watching pieces come together on projects that no one person could ever do themselves. And as a person, success comes from learning from our experiences, and especially our mistakes. As J. Michael Straczynski wrote in a Babylon 5 episode, loosely paraphrased: “Maybe this experience will be a good lesson. Too bad it was so painful, but there ain’t no other kind.”

The thing about Progeny is this – Ian built a group of people that wanted to change the world for the better. We gave it our all. And there’s nothing wrong with that.

Progeny did change the world. As us Progeny alumni have scattered around the country, we benefit from the lessons we learned there. And many of us were “different”, sort of out of place before Progeny, and there we found others that loved C compilers, bootloaders, and GPL licenses just as much as we did. We belonged, not just online but in life, and we went on to pull confidence and skill out of our experience at Progeny and use them in all sorts of ways over the years.

And so did Ian. Who could have imagined the founder of Debian and Progeny would one day lead the cause of an old-guard Unix turning Open Source? I run ZFS on my Debian system today, and Ian is partly responsible for that — and his time at Progeny is too.

So I can remember Ian, and Progeny, as a success. And I leave you with a photo of my best memento from the time there: an original unopened boxed copy of Progeny Linux.

IMG_6197_v1