Celebrating 45 Years of Kermit with the First New C-Kermit Release in 15 Years (and working with a decades-old C codebase)

1981 was a different time for computing. It was expensive (both hardware and software), and it was far from a given that machines from one vendor would be able to talk to those from another. In fact, Columbia University had just such a problem, so in 1981, Frank da Cruz and Bill Catchings designed a serial protocol they called Kermit. Because of the many quirks of the DEC-20 and IBM mainframes, the Kermit protocol was highly adaptable from the start: able to handle systems that had trouble processing more than 96 bytes of data at once, able to transfer 8-bit files over 7-bit links, able to translate between character sets (ASCII and EBCDIC then; now also various Unicodes), and of course, handling of error-prone serial links.

Kermit spread rapidly; by 1982, Kermit had been ported to MS-DOS and Unix. Eventually, C-Kermit (an implementation of Kermit in C) became the flagship Kermit. It gained TCP support, an interactive CLI, a powerful scripting language (with features from the shell, Lisp, and expect), and optimizations for today’s high-speed links, such as jumbo packets, sliding windows, and streaming modes. Along the way, Kermit flew on the International Space Station, ran data collection from sensors during hurricanes, and many other uses including postal systems, Boeing 787 manufacturing, and more.

Today, I use it as a powerful ssh wrapper (letting me easily transfer files through multiple nested ssh, sudo, su, etc. commands), a BBS client, to exchange data with me HP 48GX calculator, and so on. It’s also used today to transmit firmware updates to embedded devices. And, of course, anyone that works with vintage systems is likely to use Kermit at some point.

It wouldn’t be until the late 1990s that the TCP/IP stack was finally adopted by most OS vendors, establishing something of a common basis for communication. Of course, we assume this today. Though transferring large files between OSs (say, Linux, Windows, MacOS, Android, iPad, etc.) is still a challenge, even though they all speak TCP/IP! I find that the easiest way to get large files from two computers is to spin up Kermit (see ckwin for a Windows fork of C-Kermit) and just set up a TCP connection over the LAN. In fact, I added a new show interfaces command in C-Kermit 11, making it easy to see your system’s local IPs.

For most of its history, Columbia’s Kermit project was self-funded. Columbia charged for commercial use, which limited its inclusion in Linux distributions. In 2011, 30 years after its founding, Columbia canceled the Kermit Project and released C-Kermit as Open Source under a BSD license. Frank da Cruz, who had still been working with the Kermit project all those years, volunteered to continue maintaining Kermit outside Columbia, and continued development with alpha and beta releases through his retirement from the project in 2025.

I dive into this C codebase

As Debian maintainer of Kermit, I noticed some areas where it wasn’t matching modern expectations. One area was, not surprising for a project of its age, security. Another area was that its character set or line-ending conversions are usually not desired now; we are used to byte-identical binary transfers, and the defaults caused confusion and even some rare instances of data corruption. So I started making a few patches last year.

I’ve worked with old C codebases before, such as Varnish. I’ve generally hated it. You usually find a mix of bad and terrible practices, unclear memory management, and so forth.

But I’ve been living in the C-Kermit codebase for a few months now, and I enjoy it. Yes, this thing is still designed to build on VMS, OS/2, and with compilers that haven’t heard of ANSI — and those that require modern practices. (That em-dash was mine; I knew how to use them before LLMs existed and I’m not going to stop just because LLMs have copied people like me! No AI was used for this post.)

The there is an elegance in all of that. As I worked, I fixed a bunch more potential security issues, both with memory safety and with protecting against a malicious remote in roughly the same manner that some patches to scp did a few years back. I added IPv6 support, of course conditionally compiled because some systems C-Kermit builds on have never heard of IPv6 and never will. (And, of course, with fallback algorithms at runtime for systems that have IPv6 support but not IPv6 connectivity.)

I added unit tests and Python-based end-to-end tests, running nearly 2000 test cases in total. Along the way, I found and fixed a number of bugs going back decades. I learned about FIONREAD being broken on macOS, about NetBSD’s bugs in the pty driver, and fixed bugs in the Kermit protocol implementation itself. I added compatibility tests with the gkermit and ekermit (embedded) implementations, as well as the last full release, C-Kermit 9.0.302 from 2011 (which was difficult to get compiled on a modern system).

There is an extensive changelog describing all the improvements in C-Kermit 11.

C-Kermit development had never really used a VCS at any point, though Kermit veteran Jeffrey Altman imported historical releases into a Git repo, along with some patches that hadn’t made it into a release (which I also pulled in.) There was a lot of disabled code behind COMMENT, along with commentary describing why it was no longer used. With Git, we would now generally just remove the old code and explain why in a commit message. I went through and did so with a lot of it, meaning that, at last check, C-Kermit actually has fewer lines of code now than it used to.

Towards a new release

It became apparent pretty quickly that I was making more changes than would make sense as a Debian patch series. Not only that, but they would be more widely applicable to more than just Debian and Ubuntu users. As Linux and BSD distributions were running everything from the last non-beta release (2011’s 9.0.302) to the last beta release (about 1.5 years ago), depending on their different policies about running betas, even sharing patches in a useful fashion was going to be quite difficult.

So, I spun up a project at Open Kermit to coordinate future development in the open and keep Kermit going.

With modern CI, I run that test suite on Linux (x86_64 and arm64), macOS, FreeBSD, NetBSD, and OpenBSD. It builds binary releases on all those platforms, plus a statically-linked Linux binary built with musl libc.

You can download the latest C-Kermit release, and of course contribute to C-Kermit and its website.

Dedication

Frank da Cruz was directly involved with Kermit for 44 years. I’m not aware of any other Open Source project founder being involved for so long. Richard Stallman started working on GNU Emacs in 1984, 3 years after Frank started working on Kermit, but Richard hasn’t been in that role since around 2008.

Accordingly, C-Kermit 11 bears this dedication:

I dedicate this release of C-Kermit to Frank da Cruz.

Frank was directly involved with Kermit for 44 years, from its initial design in 1981 all the way through 2025. He maintained Kermit as an Open Source project after Columbia University ended its sponsorship. I know of no other Open Source project where the founder remains so personally involved for so long.

When Kermit was begun, transfers between different hardware and operating systems were difficult or impossible. Frank helped build a bridge. Kermit glued systems together, from the International Space Station to pocket calculators, and set a new standard for interoperability. It continues to do so.

Kermit is still one of the quietly-working pillars of computing today, enabling everything from firmware upgrades to radios. And, yes, it still reliably transfers files over serial lines.

As we start to spend a lot of time in the Kermit codebase, we do so standing on the shoulders of a giant. Thanks, Frank, for your decades of work on Kermit.

John Goerzen, July 2026

Artificial Intelligence: Shades of Gray

AI sure is a hot topic right now, and I see a lot of people arguing about it. To a lot of people around here, I’m the “computer person” they know and I get asked a lot about AI.

I’m going to suggest a lot of things can be true at once. For instance:

  • LLMs are changing how we work and will continue to do so.
  • LLMs are vastly over-hyped by vested interests, and may be in a bubble.

Or how about:

  • Huge investment in GenAI is having many negative consequences, ranging from environmental to causing affordability problems in many industries that use hardware (ie, everywhere)
  • Useful results can be had from models that run on local hardware, even battery-powered hardware, which may have negligible harm or even some benefit

And:

  • GenAI is further concentrating wealth and power in megacorps, with the effect of squeezing out the smaller players even more.
  • GenAI is lowering the cost of entry for people without a lot of resources already.

I have sympathy for the naysayers; those that say it’s nothing but a stochastic parrot. But I don’t have a lot of sympathy for the naysayers that deny ever using it; you can’t form a credible argument against something without having an understanding of it informed by experience.

I also have sympathy for the cheerleaders. I have seen some impressive things from AI; for instance, a story from an engineer who has a child with a rare disease without a credible cure. The engineer did a lot of research on it, started feeding research papers into AI to analyze, and the AI started finding correlations between different areas of research that humans hadn’t yet found — leading to a positive result for the child.

To be fair, I have rarely seen an AI deliver a 100% correct answer on anything with any real level of complexity. I have seen it both waste more time than it saves, and save a ton of time.

My point here is: It is neither always fantastic nor always terrible.

Let me talk you through an example.

I am a fan of inbox zero for email. That is, the inbox should be empty. Unfortunately, mine has 8000 messages in it. According to the oldest messages in my inbox, I last had inbox zero 8 years ago. But really, only a handful are older than 2020. I guess something must have happened that year…

I’ve been chipping away at this for quite some time now. The problem is, there are certain emails in there that really do still need some action – maybe it’s photos to save off into our photo collection, for instance. But when looking at things sorted by date or thread, there are old shipping confirmations next to phishing attempts and family photos. One can’t just scan down the list.

I’ve tried all the usual tricks, most of which involve selecting groups of message that are easy to bulk erase, or at least easy to scan visually for the occasional thing worth saving. Sort by sender or subject line, for instance. Then I can, for instance, delete all the old messages from the shopping sites I commonly use all at once. But then they start using different senders and different subject lines and that doesn’t get all of them. I’ve tried keyword searches for this sort of thing too. Still, that got me down to about 8000 messages.

So I thought: why not see if an LLM could help me classify these? Maybe it could categorize them, and then I could look at emails grouped by category.

I have one machine with a discrete GPU, an Nvidia RTX 4070. It’s a desktop machine I don’t use all that often. But I set up Ollama on it, running in a Docker container. Ollama runs models locally.

I should also mention at this point that we are solar-powered, and this time of year is a time of peak production of excess solar, because it is sunny and not much heat or AC is required. So that machine is solar-powered and isn’t causing environmental harm. In any case, charging the EV uses much more power than that GPU.

I figured I would do this in two passes. First, ask the LLM to classify each message (or a sampling of them would probably work too), letting it pick its own categories for each. Then, look at the patterns that emerge and give it a single, much smaller, set of broad categories to use and rerun it over that.

Then I can easily select messages from my Maildirs by category and process them in bulk.

I used open-interpreter pointing to that GPU on my network to help me write the scripts for this. It didn’t get things right on its own; for instance, it didn’t call the Ollama API correctly, and insisted on appending “/cur” to the path to the Maildir (which was not going to fly with Python’s maildir module). It took roughly an hour to classify those 8000 messages (or, as I had it do, the first 2000 characters of them), and then the same to do it a second time. I had it output lines in the form of “filename\tcategory” and hand-wrote the shell script that processed those.

In the end, was it useful? Yes, quite. Its classifications weren’t perfect (and it didn’t even follow my prompt perfectly; sometimes it would give me a long discussion on why it picked a certain category rather than just that category, and occasionally it picked categories not on the list). But then, neither were my manual keyword searches. So far I’ve gotten rid of nearly 1000 more messages. Several categories were a “visual scan for sanity and then delete all” sort of thing.

My emails never left my network. I didn’t rely on a cloud AI to process them. I didn’t contribute to global warming (this may have even been a case of saving energy, since it no doubt will offset quite a bit of manual time that would keep screens and room lights energized and so forth). I used about as much energy as watching a movie on a TV.

Did it complete the task for me entirely autonomously? Also no. AI isn’t a mind reader and it can’t possibly evaluate exactly what my thought process would be for a given task. But it can do a decent enough job to save me some time.

Still, this didn’t require hyperscaler datacenters. AI even runs on-phone (Google Translate being one of the most useful AI-driven apps I’ve ever seen, and it can run on-device).

Screen Power Saving in the Linux Console

I just made up a Debian trixie setup that has no need for a GUI. In fact, I rarely use the text console either. However, because the machine is dual boot and also serves another purpose, it’s connected to my main monitor and KVM switch.

The monitor has three inputs, and when whatever display it’s set to goes into powersave mode, it will seek out another one that’s active and automatically switch to it.

You can probably see where this is heading: it’s really inconvenient if one of the inputs never goes into powersave mode. And, of course, it wastes energy.

I have concluded that the Linux text console has lost the ability to enter powersave mode after an inactivity timeout. It can still do screen blanking — setting every pixel to black — but that is a distinct and much less useful thing.

You can do a lot of searching online that will tell you what to do. Almost all of it is wrong these days. For instance, none of these work:

  • Anything involving vbetool. This is really, really old advice.
  • Anything involving xset, unless you’re actually running a GUI, which is not the point of this post.
  • Anything involving setterm or the kernel parameters video=DPMS or consoleblank.
  • Anything involving writing to paths under /sys, such as ones ending in dpms.

Why is this?

Well, we are on at least the third generation of Linux text console display subsystems. (Maybe more than 3, depending on how you count.) The three major ones were:

  1. The VGA text console
  2. fbdev
  3. DRI/KMS

As I mentioned recently in my post about running an accurate 80×25 DOS-style console on modern Linux, the VGA text console mode is pretty much gone these days. It relied on hardware rendering of the text fonts, and that capability simply isn’t present on systems that aren’t PCs — or even on PCs that are UEFI, which is most of them now.

fbdev, or a framebuffer console under earlier names, has been in Linux since the late 1990s. It was the default for most distros until more recently. It supported DPMS powersave modes, and most of the instructions you will find online reference it.

Nowadays, the DRI/KMS system is used for graphics. Unfortunately, it is targeted mainly at X11 and Wayland. It is also used for the text console, but things like DPMS-enabled timeouts were never implemented there.

You can find some manual workarounds — for instance, using ddcutil or similar for an external monitor, or adjusting the backlight files under /sys on a laptop. But these have a number of flaws — making unwanted brightness adjustments, and not automatically waking up on keypress among them.

My workaround

I finally gave up and ran apt-get install xdm. Then in /etc/X11/xdm/Xsetup, I added one line:

xset dpms 0 0 120

Now the system boots into an xdm login screen, and shuts down the screen after 2 minutes of inactivity. On the rare occasion where I want a text console from it, I can switch to it and it won’t have a timeout, but I can live with that.

Thus, quite hopefully, concludes my series of way too much information about the Linux text console!

A Mail Delivery Mystery: Exim, systemd, setuid, and Docker, oh my!

On mail.quux, a node of NNCPNET (the NNCP-based peer-to-peer email network), I started noticing emails not being delivered. They were all in the queue, frozen, and Exim’s log had entries like:

unable to set gid=5001 or uid=5001 (euid=100): local delivery to [redacted] transport=nncp

Weird.

Stranger still, when I manually ran the queue with sendmail -qff -v, they all delivered fine.

Huh.

Well, I thought, it was a one-off weird thing. But then it happened again.

Upon investigating, I observed that this issue was happening only on messages submitted by SMTP. Which, on these systems, aren’t that many.

While trying different things, I tried submitting a message to myself using SMTP. Nothing to do with NNCP at all. But look at this:

 jgoerzen@[redacted] R=userforward defer (-1): require_files: error for /home/jgoerzen/.forward: Permission denied

Strraaannnge….

All the information I could find about this, even a FAQ entry, said that the problem is that Exim isn’t setuid root. But it is:

-rwsr-xr-x 1 root root 1533496 Mar 29  2025 /usr/sbin/exim4

This problem started when I upgraded to Debian Trixie. So what changed there?

There are a lot of possibilities; this is running in Docker using my docker-debian-base system, which runs a regular Debian in Docker, including systemd.

I eventually tracked it down to Exim migrating from init.d to systemd in trixie, and putting a bunch of lockdowns in its service file. After a bunch of trial and error, I determined that I needed to override this set of lockdowns to make it work. These overrides did the trick:

ProtectClock=false
PrivateDevices=false
RestrictRealtime=false
ProtectKernelModules=false
ProtectKernelTunables=false
ProtectKernelLogs=false
ProtectHostname=false

I don’t know for sure if the issue is related to setuid. But if it is, there’s nothing that immediately jumps out at me about any of these that would indicate a problem with setuid.

I also don’t know if running in Docker makes any difference.

Anyhow, problem fixed, but mystery not solved!

I’m Not Very Popular, Thankfully. That Makes The Internet Fun Again

“Like and subscribe!”

“Help us get our next thousand (or million) followers!”

I was using Linux before it was popular. Back in the day where you had to write Modelines for your XF86Config file — and do it properly, or else you might ruin your monitor. Back when there wasn’t a word processor (thankfully; that forced me to learn LaTeX, which I used to write my papers in college).

I then ran Linux on an Alpha, a difficult proposition in an era when web browsers were either closed-source or too old to be useful; all sorts of workarounds, including emulating Digital UNIX.

Recently I wrote a deep dive into the DOS VGA text mode and how to achieve it on a modern UEFI Linux system.

Nobody can monetize things like this. I am one of maybe a dozen or two people globally that care about that sort of thing. That’s fine.

Today, I’m interested in things like asynchronous communication, NNCP, and Gopher. Heck, I’m posting these words on a blog. Social media displaced those, right?

Some of the things I write about here have maybe a few dozen people on the planet interested in them. That’s fine.

I have no idea how many people read my blog. I have no idea where people hear about my posts from. I guess I can check my Mastodon profile to see how many followers I have, but it’s not something I tend to do. I don’t know if the number is going up or down, or if it is all that much in Mastodon terms (probably not).

Thank goodness.

Since I don’t have to care about what’s popular, or spend hours editing video, or thousands of dollars on video equipment, I can just sit down and write about what interests me. If that also interests you, then great. If not, you can find what interests you — also fine.

I once had a colleague that was one of these “plugged into Silicon Valley” types. He would periodically tell me, with a mixture of excitement and awe, that one of my posts had made Hacker News.

This was always news to me, because I never paid a lot of attention over there. Occasionally that would bring in some excellent discussion, but more often than not, it was comments from people that hadn’t read or understood the article trying to appear smart by arguing with what it — or rather, what they imagined it said, I guess.

The thing I value isn’t subscriber count. It’s discussion. A little discussion in the comments or on Mastodon – that’s perfect, even if only 10 people read the article. I have the most fun in a community.

And I’ll go on writing about NNCP and Gopher and non-square DOS pixels, with audiences of dozens globally. I have no advertisers to keep happy, and I enjoy it, so why not?

A Twisty Maze of Ill-Behaved Bots

Like many, bot traffic has been causing significant issues for my hosted server recently. I’ve been noticing a dramatic increase in bots that do not respect robots.txt, especially the crawl-delay I have set there. Not only that, but many of them are sending user-agent strings that are quite precisely matching what desktop browsers send. That is, they don’t identify themselves.

They posed a particular problem on two sites: my blog, and the lists.complete.org archives.

The list archives is a completely static site, but it has many pages, so the bots that are ill-behaved absolutely hammer it following links.

My blog runs WordPress. It has fewer pages, but by using PHP, doesn’t need as many hits to start to bog down. Also, there is a Mastodon thundering herd problem, and since I participate on Mastodon, this hits my server.

The solution was one of layers.

I had already added a crawl-delay line to robots.txt. It helped a bit, but many bots these days aren’t well-behaved. Next, I added WP Super Cache to my WordPress installation. I also enabled APCu in PHP and installed APCu Manager. Again, each step helped. Again, not quite enough.

Finally, I added Anubis. Installing it (especially if using the Docker container) was under-documented, but I figured it out. By default, it is designed to block AI bots and try to challenge everything with “Mozilla” in its user-agent (which is most things) with a Javascript challenge.

That’s not quite what I want. If a bot is well-behaved, AI or otherwise, it will respect my robots.txt and I can more precisely control it there. Also, I intentionally support non-Javascript browsers on many of the sites I host, so I wanted to be judicious. Eventually I configured Anubis to only challenge things that present a user-agent that looks fully like a real browser. In other words, real browsers should pass right through, and bad bots pretending to be real browsers will fail.

That was quite effective. It reduced load further to the point where things are ordinarily fairly snappy.

I had previously been using mod_security to block some bots, but it seemed to be getting in the way of the Fediverse at times. When I disabled it, I observed another increase in speed. Anubis was likely going to get rid of those annoying bots itself anyhow.

As a final step, I migrated to a faster hosting option. This post will show me how well it survives the Mastodon thundering herd!

Update: Yes, it handled it quite nicely now.

Running an Accurate 80×25 DOS-Style Console on Modern Linux Is Possible After All

Here, in classic Goerzen deep dive fashion, is more information than you knew you wanted about a topic you’ve probably never thought of. I found it pretty interesting, because it took me down a rabbit hole of subsystems I’ve never worked with much and a mishmash of 1980s and 2020s tech.

I had previously tried and failed to get an actual 80x25 Linux console, but I’ve since figured it out!

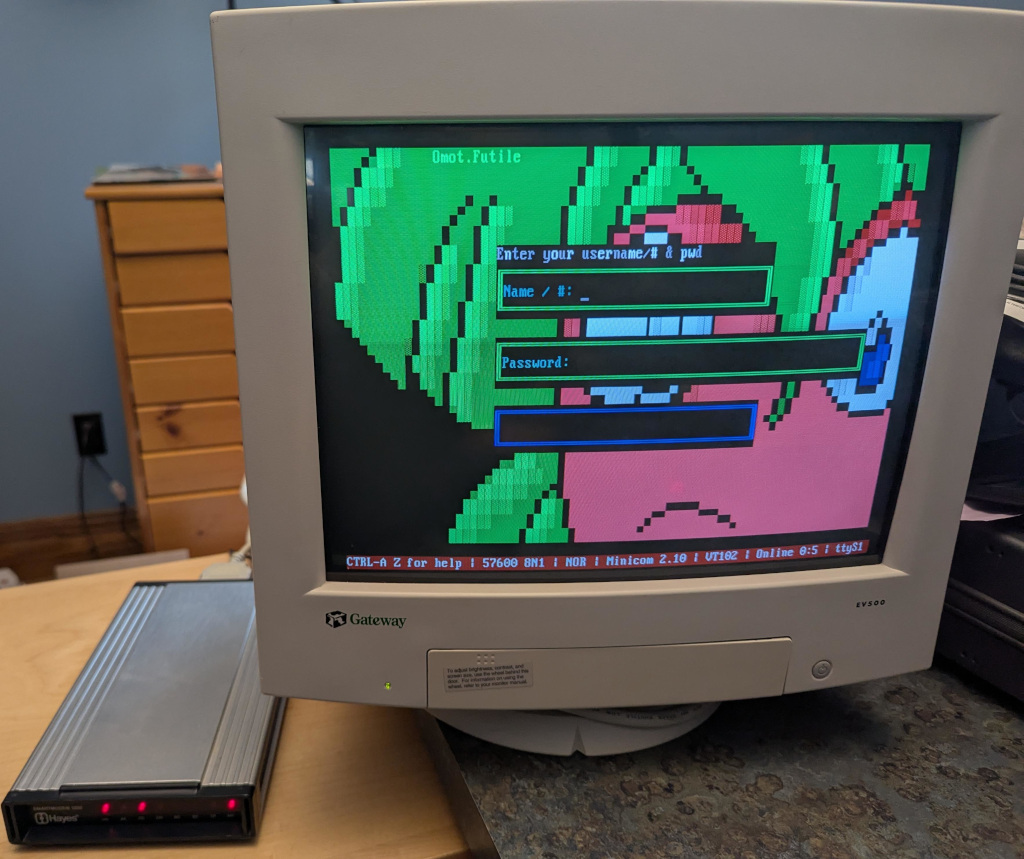
This post is about the Linux text console – not X or Wayland. We’re going to get the console right without using those systems. These instructions are for Debian trixie, but should be broadly applicable elsewhere also. The end result can look like this:

Photo of a color VGA monitor displaying a BBS login screen

(That’s a Wifi Retromodem that I got at VCFMW last year in the Hayes modem case)

What’s a pixel?

How would you define a “pixel” these days? Probably something like “a uniquely-addressable square dot in a two-dimensional grid”.

In the world of VGA and CRTs, that was just a logical abstraction. We got an API centered around that because it was convenient. But, down the VGA cable and on the device, that’s not what a pixel was.

A pixel, back then, was a time interval. On a multisync monitor, which were common except in the very early days of VGA, the timings could be adjusted which produced logical pixels of different sizes. Those screens often had a maximum resolution but not necessarily a “native resolution” in the sense that an LCD panel does. Different timings produced different-sized pixels with equal clarity (or, on cheaper monitors, equal fuzziness).

A side effect of this was that pixels need not be square. And, in fact, in the standard DOS VGA 80x25 text mode, they weren’t.

You might be seeing why DVI, DisplayPort, and HDMI replaced VGA for LCD monitors: with a VGA cable, you did a pixel-to-analog-timings conversion, then the display did a timings-to-pixels conversion, and this process could be a bit lossy. (Hence why you sometimes needed to fill the screen with an image and push the “center” button on those older LCD screens)

(Note to the pedantically-inclined: yes I am aware that I have simplified several things here; for instance, a color LCD pixel is made up of approximately 3 sub-dots of varying colors, and that things like color eInk displays have two pixel grids with different sizes of pixels layered atop each other, and printers are another confusing thing altogether, and and and…. MOST PEOPLE THINK OF A PIXEL AS A DOT THESE DAYS, OK?)

What was DOS text mode?

We think of this as the “standard” display: 80 columns wide and 25 rows tall. 80x25. By the time Linux came along, the standard Linux console was VGA text mode – something like the 4th incarnation of text modes on PCs (after CGA, MDA, and EGA). VGA also supported certain other sizes of characters giving certain other text dimensions, but if I cover all of those, this will explode into a ridiculously more massive page than it already is.

So to display text on an 80x25 DOS VGA system, ultimately characters and attributes were written into the text buffer in memory. The VGA system then rendered it to the display as a 720x400 image (at 70Hz) with non-square pixels such that the result was approximately a 4:3 aspect ratio.

The font used for this rendering was a bitmapped one using 8x16 cells. You might do some math here and point out that 8 * 80 is only 640, and you’d be correct. The fonts were 8x16 but the rendered cells were 9x16. The extra pixel was normally used for spacing between characters. However, in line graphics mode, characters 0xC0 through 0xDF repeated the 8th column in the position of the 9th, allowing the continuous line-drawing characters we’re used to from TUIs.

Problems rendering DOS fonts on modern systems

By now, you’re probably seeing some of the issues we have rendering DOS screens on more modern systems. These aren’t new at all; I remember some of these from back in the days when I ran OS/2, and I think also saw them on various terminals and consoles in OS/2 and Windows.

Some issues you’d encounter would be:

  • Incorrect aspect ratio caused by using the original font and rendering it using 1:1 square pixels (resulting in a squashed appearance)
  • Incorrect aspect ratio for ANOTHER reason, caused by failing to render column 9, resulting in text that is overall too narrow
  • Characters appearing to be touching each other when they shouldn’t (failing to render column 9; looking at you, dosbox)
  • Gaps between line drawing characters that should be continuous, caused by rendering column 9 as empty space in all cases

Character set issues

DOS was around long before Unicode was. In the DOS world, there were codepages that selected the glyphs for roughly the high half of the 256 possible characters. CP437 was the standard for the USA; others existed for other locations that needed different characters. On Unix, the USA pre-Unicode standard was Latin-1. Same concept, but with different character mappings.

Nowadays, just about everything is based on UTF-8. So, we need some way to map our CP437 glyphs into Unicode space. If we are displaying DOS-based content, we’ll also need a way to map CP437 characters to Unicode for display later, and we need these maps to match so that everything comes out right. Whew.

So, let’s get on with setting this up!

Selecting the proper video mode

As explained in my previous post, proper hardware support for DOS text mode is limited to x86 machines that do not use UEFI. Non-x86 machines, or x86 machines with UEFI, simply do not contain the necessary support for it. As these are now standard, most of the time, the text console you see on Linux is actually the kernel driving the video hardware in graphics mode, and doing the text rendering in software.

That’s all well and good, but it makes it quite difficult to actually get an 80x25 console.

First, we need to be running at 720x400. This is where I ran into difficulty last time. I realized that my laptop’s LCD didn’t advertise any video modes other than its own native resolution. However, almost all external monitors will, and 720x400@70 is a standard VGA mode from way back, so it should be well-supported.

You need to find the Linux device name for your device. You can look at the possible devices with ls -l /sys/class/drm. If you also have a GUI, xrandr may help too. But in any case, each directory under /sys/class/drm has a file named modes, and if you cat them all, you will eventually come across one with a bunch of modes defined. Drop the leading “card0” or whatever from the directory name, and that’s your device. (Verify that 720x400 is in modes while you’re at it.)

Now, you’re going to edit /etc/default/grub and add something like this to GRUB_CMDLINE_LINUX_DEFAULT:

video=DP-1:720x400@70

Of course, replace DP-1 with whatever your device is.

Now you can run update-grub and reboot. You should have a 720x400 display.

At first, I thought I had succeeded by using Linux’s built-in VGA font with that mode. But it looked too tall. After noticing that repeated 0s were touching, I got suspicious about the missing 9th column in the cells. stty -a showed that my screen was 90x25, which is exactly what it would show if I was using 8x16 instead of 9x16 cells. Sooo…. I need to prepare a 9x16 font.

Preparing a font

Here’s where it gets complicated.

I’ll give you the simple version and the hard mode.

The simple mode is this: Download https://www.complete.org/downloads/CP437-VGA.psf.gz and stick it in /usr/local/etc, then skip to the “Activating the font” section below.

The font assembled here is based on the Ultimate Oldschool PC Font Pack v2.2, which is (c) 2016-2020 VileR and licensed under Creative Commons Attribution-ShareAlike 4.0 International License. My psf file is derived from this using the instructions below.

Building it yourself

First, install some necessary software: apt-get install fontforge bdf2psf

Start by going to the Oldschool PC Font Pack Download page. Download oldschool_pc_font_pack_v2.2_FULL.zip and unpack it.

The file we’re interested in is otb - Bm (linux bitmap)/Bm437_IBM_VGA_9x16.otb. Open it in fontforge by running fontforge BmPlus_IBM_VGA_9x16.otb. When it asks if you will load the bitmap fonts, hit select all, then yes. Go to File -> generate fonts. Save in a BDF, no need for outlines, and use “guess” for resolution.

Now you have a file such as Bm437_IBM_VGA_9x16-16.bdf. Excellent.

Now we need to generate a Unicode map file. We will make sure this matches the system’s by enumerating every character from 0x00 to 0xFF, converting it from CP437 to Unicode, and writing the appropriate map.

Here’s a Python script to do that:

for i in range(0, 256):
    cp437b = b'%c' % i
    uni = ord(cp437b.decode('cp437'))
    print(f"U+{uni:04x}")

Save that file as genmap.py and run python3 genmap.py > cp437-uni.

Now, we’re ready to build the psf file:

bdf2psf --fb Bm437_IBM_VGA_9x16-16.bdf \
  /dev/null cp437-uni 256 CP437-VGA.psf

By convention, we normally store these files gzipped, so gzip CP437-VGA.psf.

You can test it on the console with setfont CP437-VGA.psf.gz.

Now copy this file into /usr/local/etc.

Activating the font

Now, edit /etc/default/console-setup. It should look like this:

# CONFIGURATION FILE FOR SETUPCON

# Consult the console-setup(5) manual page.

ACTIVE_CONSOLES="/dev/tty[1-6]"

CHARMAP="UTF-8"

CODESET="Lat15"
FONTFACE="VGA"
FONTSIZE="8x16"
FONT=/usr/local/etc/CP437-VGA.psf.gz

VIDEOMODE=

# The following is an example how to use a braille font
# FONT='lat9w-08.psf.gz brl-8x8.psf'

At this point, you should be able to reboot. You should have a proper 80x25 display! Log in and run stty -a to verify it is indeed 80x25.

Using and testing CP437

Part of the point of CP437 is to be able to access BBSs, ANSI art, and similar.

Now, remember, the Linux console is still in UTF-8 mode, so we have to translate CP437 to UTF-8, then let our font map translate it back to CP437. A weird trip, but it works.

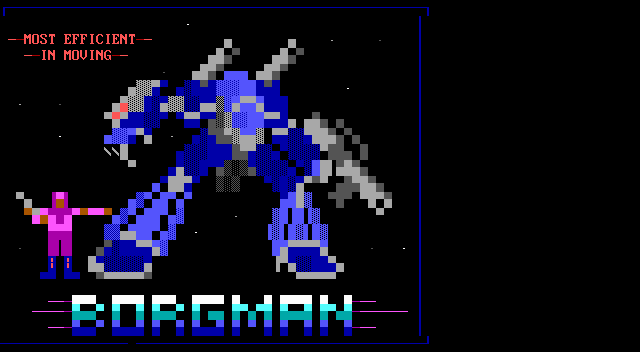
Let’s test it using the Textfiles ANSI art collection. In the artworks section, I randomly grabbed a file near the top: borgman.ans. Download that, and display with:

clear; iconv -f CP437 -t UTF-8 < borgman.ans

You should see something similar to – but actually more accurate than – the textfiles PNG rendering of it, which you’ll note has an incorrect aspect ratio and some rendering issues. I spot-checked with a few others and they seemed to look good. belinda.ans in particular tries quite a few characters and should give you a good sense if it is working.

Use with interactive programs

That’s all well and good, but you’re probably going to want to actually use this with some interactive program that expects CP437. Maybe Minicom, Kermit, or even just telnet?

For this, you’ll want to apt-get install luit. luit maps CP437 (or any other encoding) to UTF-8 for display, and then of course the Linux console maps UTF-8 back to the CP437 font.

Here’s a way you can repeat the earlier experiment using luit to run the cat program:

clear; luit -encoding CP437 cat borgman.ans

You can run any command under luit. You can even run luit -encoding CP437 bash if you like. If you do this, it is probably a good idea to follow my instructions on generating locales on my post on serial terminals, and then within luit, set LANG=en_us.IBM437. But note especially that you can run programs like minicom and others for accessing BBSs under luit.

Final words

This gave you a nice DOS-type console. Although it doesn’t have glyphs for many codepoints, it does run in UTF-8 mode and therefore is compatible with modern software.

You can achieve greater compatibility with more UTF-8 codepoints with the DOS font, at the expense of accuracy of character rendering (especially for the double-line drawing characters) by using /usr/share/bdf2psf/standard.equivalents instead of /dev/null in the bdf2psf command.

Or you could go for another challenge, such as using the DEC vt-series fonts for coverage of ISO-8859-1. But just using fonts extracted from DEC ROM won’t work properly, because DEC terminals had even more strangeness going on than DOS fonts.

Installing and Using Debian With My Decades-Old Genuine DEC vt510 Serial Terminal

Six years ago, I was inspired to buy a DEC serial terminal. Since then, my collection has grown to include several DEC models, an IBM 3151, a Wyse WY-55, a Televideo 990, and a few others.

When you are running a terminal program on Linux or MacOS, what you are really running is a terminal emulator. In almost all cases, the terminal emulator is emulating one of the DEC terminals in the vt100 through vt520 line, which themselves use a command set based on an ANSI standard.

In short, you spend all day using a program designed to pretend to be the exact kind of physical machine I’m using for this experiment!

I have long used my terminals connected to a Raspberry Pi 4, but due to the difficulty of entering a root filesystem encryption password using a serial console on a Raspberry Pi, I am switching to an x86 Mini PC (with a N100 CPU).

While I have used a terminal with the Pi, I’ve never before used it as a serial console all the way from early boot, and I have never installed Debian using the terminal to run the installer. A serial terminal gives you a login prompt. A serial console gives you access to kernel messages, the initrd environment, and sometimes even the bootloader.

This might be fun, I thought.

I selected one of my vt510 terminals for this. It is one of my newer ones, having been built in 1993. But it has a key feature: I can remap Ctrl to be at the caps lock position, something I do on every other system I use anyhow. I could have easily selected an older one from the 1980s.

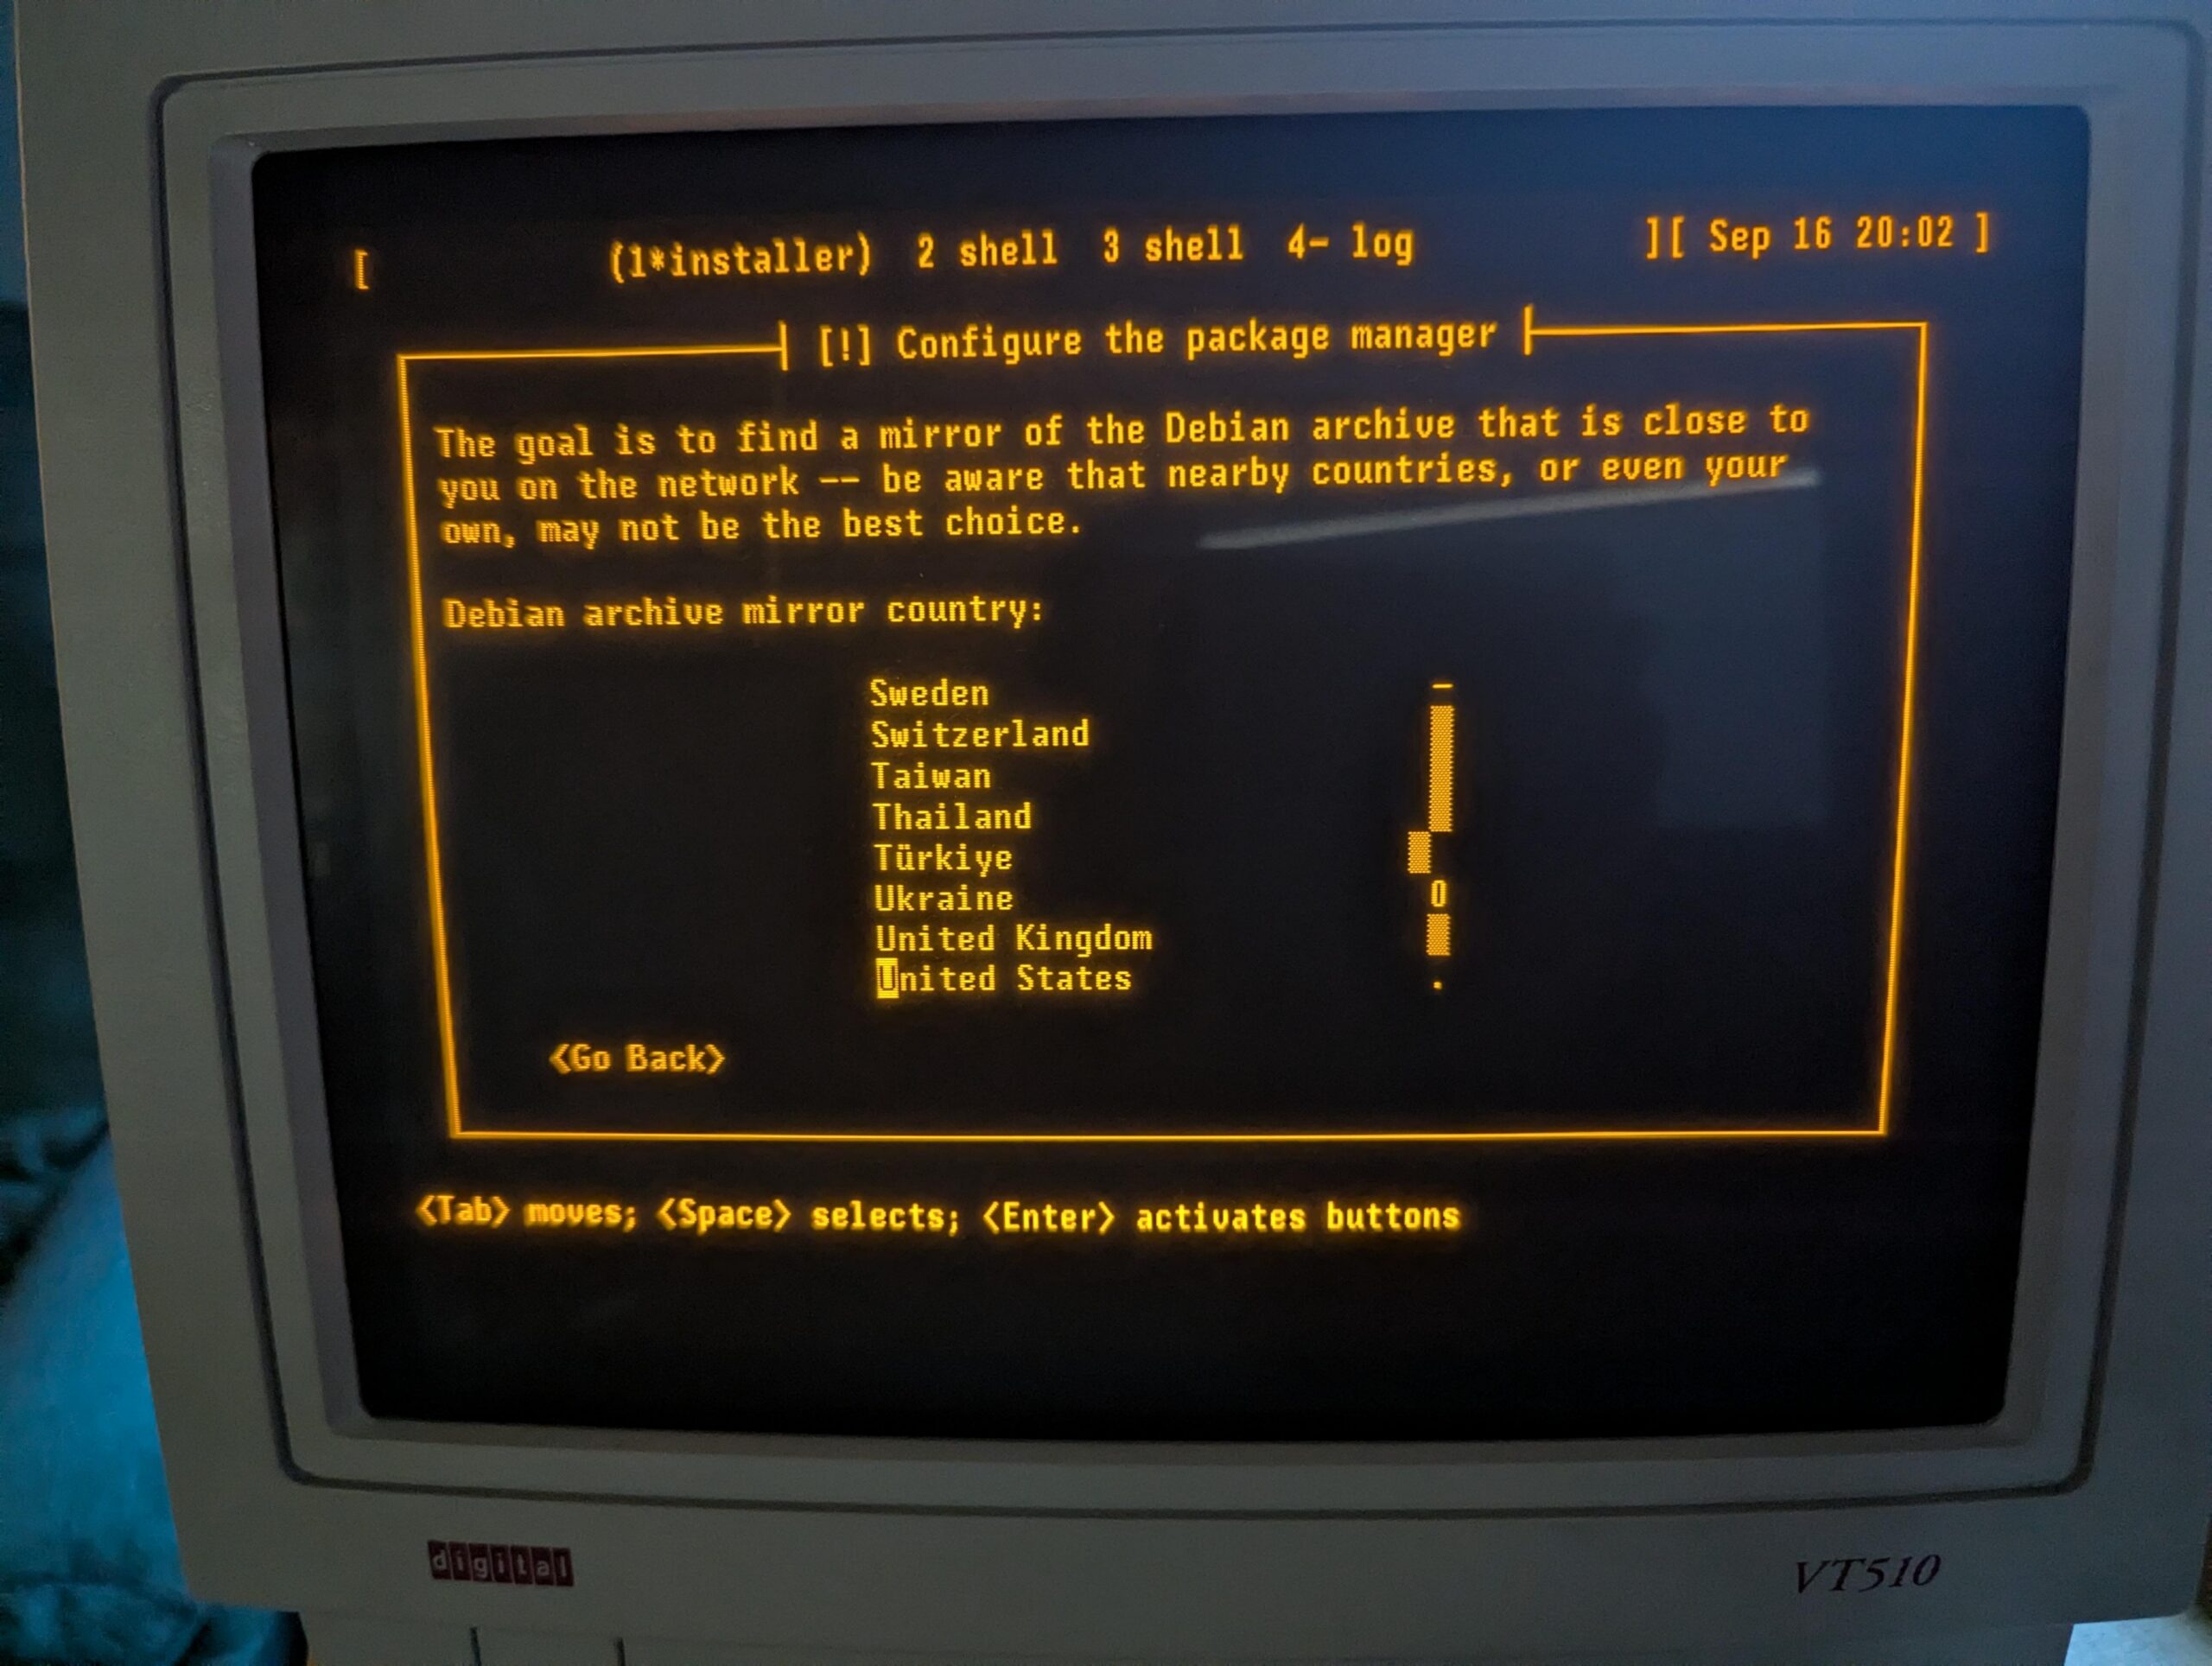
A DEC vt510 terminal showing the Debian installer

Kernel configuration

To enable a serial console for Linux, you need to pass a parameter on the kernel command line. See the kernel documentaiton for more. I very frequently see instructions that are incomplete; they particularly omit flow control, which is most definitely needed for these real serial terminals.

I run my terminal at 57600 bps, so the parameter I need is console=ttyS0,57600n8r. The “r” means to use hardware flow control (ttyS0 corresponds to the first serial port on the system; use ttyS1 or something else as appropriate for your situation). While booting the Debian installer, according to Debian’s instructions, it may be useful to also add TERM=vt102 (the installer doesn’t support the vt510 terminal type directly). The TERM parameter should not be specified on a running system after instlalation.

Booting the Debian installer

When you start the Debian installer, to get it into serial mode, you have a couple of options:

  1. You can use a traditional display and keyboard just long enough to input the kernel parameters described above
  2. You can edit the bootloader configuration on the installer’s filesystem prior to booting from it

Option 1 is pretty easy. Option 2 is hard mode, but not that bad.

On x86, the Debian installer boots in at least two different ways: it uses GRUB if you’re booting under UEFI (which is most systems these days), or ISOLINUX if you are booting from the BIOS.

If using GRUB, the file to edit on the installer image is boot/grub/grub.cfg.

Near the top, add these lines:

serial --unit=0 --speed=57600 --word=8 --parity=no --stop=1
terminal_input console serial
terminal_output console serial

Unit 0 corresponds to ttyS0 as above.

GRUB’s serial command does not support flow control. If your terminal gets corrupted during the GRUB stage, you may need to configure it to a slower speed.

Then, find the “linux” line under the “Install” menuentry. Edit it to insert console=ttyS0,57600n8r TERM=vt102 right after the vga=788.

Save, unmount, and boot. You should see the GRUB screen displayed on your serial terminal. Select the Install option and the installer begins.

If you are using BIOS boot, I’m sure you can do something similar with the files in the isolinux directory, but haven’t researched it.

Now, you can install Debian like usual!

Configuring the System

I was pleasantly surprised to find that Debian’s installer took care of many, but not all, of the things I want to do in order to make the system work nicely with a serial terminal. You can perform these steps from a chroot under the installer environment before a reboot, or later in the running system.

First, while Debian does set up a getty (the program that displays the login prompt) on the serial console by default, it doesn’t enable hardware flow control. So let’s do that.

Configuring the System: agetty with systemd

Run systemctl edit serial-getty@ttyS0.service. This opens an editor that lets you customize the systemd configuration for a given service without having to edit the file directly. All you really need to do is modify the agetty command, so we just override it. At the top, in the designated area, write:

[Service]
ExecStart=
ExecStart=-/sbin/agetty --wait-cr -8 -h -L=always %I 57600 vt510

The empty ExecStart= line is necessary to tell systemd to remove the existing ExecStart command (otherwise, it will logically contain two ExecStart lines, which is an error).

These arguments say:

  • –wait-cr means to wait for the user to press Return at the terminal before attempting to display the login prompt
  • -8 tells it to assume 8-bit mode on the serial line
  • -h enables hardware flow control
  • -L=always enables local line mode, disabling monitoring of modem control lines
  • %I substitutes the name of the port from systemd
  • 57600 gives the desired speed, and vt510 gives the desired setting for the TERM environment variable

The systemd documentation refers to this page about serial consoles, which gives more background. However, I think it is better to use the systemctl edit method described here, rather than just copying the config file, since this lets things like new configurations with new Debian versions take effect.

Configuring the System: Kernel and GRUB

Your next stop is the /etc/default/grub file. Debian’s installer automatically makes some changes here. There are three lines you want to change. First, near the top, edit GRUB_CMDLINE_LINUX_DEFAULT and add console=tty0 console=ttyS0,57600n8r. By specifying console twice, you allow output to go both to the standard display and to the serial console. By specifying the serial console last, you make it be the preferred one for things like entering the root filesystem password.

Next, towards the bottom, make sure these two lines look like this:

GRUB_TERMINAL="console serial"
GRUB_SERIAL_COMMAND="serial --unit=0 --speed=57600 --word=8 --parity=no --stop=1"

Finally, near the top, you may want to raise the GRUB_TIMEOUT to somewhere around 10 to 20 seconds since things may be a bit slower than you’re used to.

Save the file and run update-grub.

Now, GRUB will display on both your standard display and the serial console. You can edit the boot command from either. If you have a VGA or HDMI monitor attached, for instance, and need to not use the serial console, you can just edit the Linux command line in GRUB and remove the reference to ttyS0 for one boot. Easy!

That’s it. You now have a system that is fully operational from a serial terminal.

My original article from 2019 has some additional hints, including on how to convert from UTF-8 for these terminals.

Update 2025-09-17: It is also useful to set up proper locales. To do this, first edit /etc/locale.gen. Make sure to add, or uncomment:

en_US ISO-8859-1
en_US.IBM437 IBM437
en_US.UTF-8 UTF-8 

Then run locale-gen. Normally, your LANG will be set to en_us.UTF-8, which will select the appropriate encoding. Plain en_US will select ISO-8859-1, which you need for the vt510. Then, add something like this to your ~/.bashrc:

if [ `tty` = "/dev/ttyS0" -o "$TERM" = "vt510" ]; then
        stty -iutf8
        # might add ixon ixoff
        export LANG=en_US
        export MANOPT="-E ascii"
        stty rows 25
fi

if [ "$TERM" = "screen" -o "$TERM" = "vt100" ]; then
    export LANG=en_US.utf8
fi

Finally, in my ~/.screenrc, I have this. It lets screen convert between UTF-8 and ISO-8859-1:

defencoding UTF-8
startup_message off
vbell off
termcapinfo * XC=B%,‐-,
maptimeout 5
bindkey -k ku stuff ^[OA
bindkey -k kd stuff ^[OB
bindkey -k kr stuff ^[OC
bindkey -k kl stuff ^[OD

I just want an 80×25 console, but that’s no longer possible

Update 2025-09-18: I figured out how to do this, at least for many non-laptop screens. This post still contains a lot of good background detail, however.

Somehow along the way, a feature that I’ve had across DOS, OS/2, FreeBSD, and Linux — and has been present on PCs for more than 40 years — is gone.

That feature, of course, is the 80×25 text console.

Linux has, for awhile now, rendered its text console using graphic modes. You can read all about it here. This has been necessary because only PCs really had the 80×25 text mode (Raspberry Pis, for instance, never did), and even they don’t have it when booted with UEFI.

I’ve lately been annoyed that:

  • The console is a different size on every screen — both in terms of size of letters and the dimensions of it
  • If a given machine has more than one display, one or both of them will have parts of the console chopped off
  • My system seems to run with three different resolutions or fonts at different points of the boot process. One during the initrd, and two different ones during the remaining boot.

And, I wanted to run some software on the console that was designed with 80×25 in mind. And I’d like to be able to plug in an old VGA monitor and have it just work if I want to do that.

That shouldn’t be so hard, right? Well, the old vga= option that you are used to doesn’t work when you booted from UEFI or on non-x86 platforms. Most of the tricks you see online for changing resolutions, etc., are no longer relevant. And things like setting a resolution with GRUB are useless for systems that don’t use GRUB (including ARM).

VGA text mode uses 8×16 glyphs in 9×16 cells, where the pixels are non-square, giving a native resolution of 720×400 (which historically ran at 70Hz), which should have streched pixels to make a 4:3 image.

While it is possible to select a console font, and 8×16 fonts are present and supported in Linux, it appears to be impossible to have a standard way to set 720×400 so that they present in a reasonable size, at the correct aspect ratio, with 80×25.

Tricks like nomodeset no longer work on UEFI or ARM systems. It’s possible that kmscon or something like it may help, but I’m not even certain of that (video=eDP1:720×400 produced an error saying that 720×400 wasn’t a supported mode, so I’m unsure kmscon would be any better.) Not that it matters; all the kmscon options to select a font or zoom are broken, and it doesn’t offer mode selection anyhow.

I think I’m going to have to track down an old machine.

Sigh.

Performant Full-Disk Encryption on a Raspberry Pi, but Foiled by Twisty UARTs

In my post yesterday, ARM is great, ARM is terrible (and so is RISC-V), I described my desire to find ARM hardware with AES instructions to support full-disk encryption, and the poor state of the OS ecosystem around the newer ARM boards.

I was anticipating buying either a newer ARM SBC or an x86 mini PC of some sort.

More-efficient AES alternatives

Always one to think, “what if I didn’t have to actually buy something”, I decided to research whether it was possible to use encryption algorithms that are more performant on the Raspberry Pi 4 I already have.

The answer was yes. From cryptsetup benchmark:

root@mccoy:~# cryptsetup benchmark --cipher=xchacha12,aes-adiantum-plain64 
# Tests are approximate using memory only (no storage IO).
#            Algorithm |       Key |      Encryption |      Decryption
xchacha12,aes-adiantum        256b       159.7 MiB/s       160.0 MiB/s
xchacha20,aes-adiantum        256b       116.7 MiB/s       169.1 MiB/s
    aes-xts                   256b        52.5 MiB/s        52.6 MiB/s

With best-case reads from my SD card at 45MB/s (with dd if=/dev/mmcblk0 of=/dev/null bs=1048576 status=progress), either of the ChaCha-based algorithms will be fast enough. “Great,” I thought. “Now I can just solve this problem without spending a dollar.”

But not so fast.

Serial terminals vs. serial consoles

My primary use case for this device is to drive my actual old DEC vt510 terminal. I have long been able to do that by running a getty for my FTDI-based USB-to-serial converter on /dev/ttyUSB0. This gets me a login prompt, and I can do whatever I need from there.

This does not get me a serial console, however. The serial console would show kernel messages and could be used to interact with the pre-multiuser stages of the system — that is, everything before the loging prompt. You can use it to access an emergency shell for repair, etc.

Although I have long booted that kernel with console=tty0 console=ttyUSB0,57600, the serial console has never worked but I’d never bothered investigating because the text terminal was sufficient.

You might be seeing where this is going: to have root on an encrypted LUKS volume, you have to enter the decryption password in the pre-multiuser environment (which happens to be on the initramfs).

So I started looking. First, I extracted the initrd with cpio and noticed that the ftdi_sio and usbserial modules weren’t present. Added them to /etc/initramfs-tools/modules and rebooted; no better.

So I found the kernel’s serial console guide, which explicitly notes “To use a serial port as console you need to compile the support into your kernel”. Well, I have no desire to custom-build a kernel on a Raspberry Pi with MicroSD storage every time a new kernel comes out.

I thought — well I don’t stricly need the kernel to know about the console on /dev/ttyUSB0 for this; I just need the password prompt — which comes from userspace — to know about it.

So I looked at the initramfs code, and wouldn’t you know it, it uses /dev/console. Looking at /proc/consoles on that system, indeed it doesn’t show ttyUSB0. So even though it is possible to load the USB serial driver in the initramfs, there is no way to make the initramfs use it, because it only uses whatever the kernel recognizes as a console, and the kernel won’t recognize this. So there is no way to use a USB-to-serial adapter to enter a password for an encrypted root filesystem.

Drat.

The on-board UARTs?

I can hear you know: “The Pi already has on-board serial support! Why not use that?”

Ah yes, the reason I don’t want to use that is because it is difficult to use that, particularly if you want to have RTS/CTS hardware flow control (or DTR/DSR on these old terminals, but that’s another story, and I built a custom cable to map it to RTS/CTS anyhow).

Since you asked, I’ll take you down this unpleasant path.

The GPIO typically has only 2 pins for serial communication: 8 and 10, for TX and RX, respectively.

But dive in and you get into a confusing maze of UARTs. The “mini UART”, the one we are mostly familiar with on the Pi, does not support hardware flow control. The PL011 does. So the natural question is: how do we switch to the PL011, and what pins does it use? Great questions, and the answer is undocumented, at least for the Pi 4.

According to that page, for the Pi 4, the primary UART is UART1, UART1 is the mini UART, “the secondary UART is not normally present on the GPIO connector” and might be used by Bluetooth anyway, and there is no documented pin for RTS/CTS anyhow. (Let alone some of the other lines modems use) There are supposed to be /dev/ttyAMA* devices, but I don’t have those. There’s an enable_uart kernel parameter, which does things like stop the mini UART from changing baud rates every time the VPU changes clock frequency (I am not making this up!), but doesn’t seem to control the PL011 UART selection. This page has a program to do it, and map some GPIO pins to RTS/CTS, in theory.

Even if you get all that working, you still have the problem that the Pi UARTs (all of them of every type) is 3.3V and RS-232 is 5V, so unless you get a converter, you will fry your Pi the moment you connect it to something useful. So, you’re probably looking at some soldering and such just to build a cable that will work with an iffy stack.

So, I could probably make it work given enough time, but I don’t have that time to spare working with weird Pi serial problems, so I have always used USB converters when I need serial from a Pi.

Conclusion

I bought a fanless x86 micro PC with a N100 chip and all the ports I might want: a couple of DB-9 serial ports, some Ethernet ports, HDMI and VGA ports, and built-in wifi. Done.